Friday, February 20, 2009

One Key Recovery - OKR not OK?

Apart from the noise of the fan (which is the number one complaint from user of the S10), the OKR has also received a lot of posts in the S10 Forums and is also a source of confusion for some users.

Firstly, the name OKR itself is already confusing since it is sometimes referred as One Key Rescue, One Key Restore or One Key Recovery and are used interchangeably. Strictly speaking there are two parts to this OKR. One is the Windows programme (OneKey Recovery 6.0) that you can start normally from within Windows or by pressing the OKR key (the orange arched key at the top of the keyboard) when Windows is running. This will bring you to the screen below. This should rightly be called One Key Backup.

This is where you can backup your system partition (normally drive C:) into an image file in drive D: (by default) or another location of your choice. When I tried this on my S10, it took about one hour to create the image file that was about 8G in size. Below are the steps involved.


Once you have this image file, you can now create bootable recovery discs either on CD or DVD. Of course you will need to have a USB CD/DVD burner to do this. Here are the stages involved.


Don't be alarm if initially the time remaining shows something like 4 hours but in reality it takes much shorter; in my case, it took 40 minutes to burn 9 CD's. The actual time will depend on the size of the image file and also the speed of the burner used.

Now that you have got your backup image, how do you proceed to restore your system in case of problem? There is no restore menu under this One Key Recovery programme. This is where you need to get into the other programme - the One Key Rescue System. You can only access this by pressing the OKR button on the keyboard when Windows or the power is off as this program runs independent of Windows itself. Make sure your battery has sufficient power left or better still, plug into the mains power before you press this button since the restoration process may take some time depending on the options.

It is here that you can choose to restore what you have backup earlier OR to restore the original factory default settings.

The program will take some time to start and in fact at times there seems to be no activity so you need to be patient. It is here that you can choose to restore your system from the backup image file you created OR to restore the original factory default settings. There is only one requirement if you want to get back to the factory setting - the size of your C: drive must not be physically changed i.e. it must be the same size as when you got it the first time. For those of you who has re-partitioned drive C: or combined with D: drive, etc, you will not be able to restore to the original factory setting. (Many of you will say, who cares!) However, if you have physically changed partition C:, what your have backup can still work and it will be restored to whatever state it was in when the backup image was made. So the choice is yours.

If you have made the backup discs, they are bootable and you just run them normally when you power up without going into the One Key Rescue. Also they can be used to restore your system if you have upgraded to a new hard disk drive (HDD).

By the way, you can access the Help under the One Key Rescue program by clicking the ? on the screen. It gives a much better explanation that the printed user guide provided with the S10.


The main issue is that users are not too keen with the OKR and users would much prefer to have the Windows discs rather than the recovery key. These can be used as and when required and are much more flexible than creating backup discs if one just want to re-install Windows either because of some problem or upgrading to another HDD. Just imagine, my backup took up 9 CD's! I suppose it's time to switch to DVD's.

(Please note, all the above refers to the Lenovo S10. I believe the S10e does not come with the OKR function.)

Ronald Kwok

http://cbpirate.com/s/cbp/ronaldkwok


Saturday, February 7, 2009

Let there be light (and RAM)

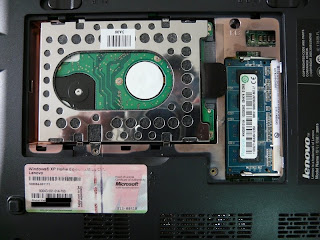
Today I did my first mod for my S10 and this must be the simplest. I just added a 2G RAM. My S10 came with 1G RAM which consists of two 512M RAM's, one is soldered in and the other in the RAM slot. To upgrade, I removed the 512M RAM from the slot and replaced it with a 2G RAM. (I used a Kingston 5300 DDR2 667 module). Thus the 512B RAM is left soldered in but the total usable memory is only 2G which is the limit of what the processor can access. Thus 512M of memory is wasted.


To carry out this upgrade, first disconnect the mains and the battery. This is to prevent any stored stray current from damaging the RAM. Next, touch any metal surface to dischage any static current from your body. Remove the two screws at the bottom of the S10 and pull out the cover. You will see the installed RAM or the empty RAM slot on the right, depending on what size of memory came with your unit. On the left is the HDD which you can also easily upgrade if you so wish.


If there is a RAM istalled, spread the securing clips on either side of the RAM and it will pop up at about 45 degrees.


Carefully remove this RAM and inset your new RAM into position, at about 45 degrees slope. Press down the RAM until you hear the click of the securing clips and you are done. If not, spread the clip and repeat the whole process.


When you put back the cover, press down firmly at the threee palces where there are catches. The cover may not be flushed initially but once you tighten the two screws, it should be.


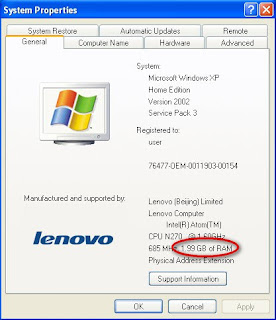
You can check the amount of memory you have by going into the System Properties. To get there, go to the Control panel > Performance & Maintenance > System, or from My Computer > View System Information under System Task. Near the bottom of the System Properties you will see the size of the memory reported.


In fact Lenovo has a series of video if you want to carry out more modification to your S10, though they are meant more for service personnel. Anyway, they can be found here, courtesy of skyhook59 in the Lenovo S10 Forum. With these you can take your S10 apart and (hopefully) put it back together again. But do be mindful that certain modifications may void the warranty of your S10 so check with Lenovo first.


For those less adventurous, here's just a tour of the various indicators available on the S10. There are three LED's at the front. The first is the power indicator which will be blue when the S10 is on either on AC or battery. The second is the battery indicator. It will be orange if the battery is charging and blue if the battery is fully charged. The third is the wireless indicator. It will be blue if WiFi is on, orange if Bluetooth is on and purple (blue + orange = purple) if both are on. These will flicker when there is any wireless activities.


If this is not lit at all, check that the wireless function is switched on by pressing the green wireless button next to the orange One Key Recovery button on the top of the keyboard. Once the wireless is on, you can select either the WiFi or Bluetooth or both to be on by pressing Fn F5 to access the wireless setting window below.


If you are not using any Bluetooth devices, it is best to turn Bluetooth off since it will save you some battery power.

The other three indicators are found next to the power-on switch at the top of the keyboard. They are the CapsLock, NumLock and HDD indicators. Of particular interest is the NumLock. For some strange (and unknown) reasons, the NumLock is enabled when the S10 is first switched on, out of the box. Not sure even if the NumLock light is on or not in this first instance. Because of this, it has caused a lot of frustration to user who had problems connecting to their secured wireless network for the first time. This is because the NumLock is on unknowingly and when one keys in the security or authentication key it will be wrong if the digit 0 (zero) is used as a / (slash) will be entered instead. (The slash is on the zero key - top row of the numbers - and will be entered when pressed if NumLock is on.) Users will not know since all you can see is just ********** as the key. Of course they cannot connect to their wireless network since the security/authentication keys do not match.
So if you have problems connecting to your secured wireless network (or entering other passwords), first cycle through the Fn F7 to make sure that NumLock is not on. After the first switch-on, the Fn F7 will function normally. It will be interesting if users can feedback any other quirks they find on their S10 in the comments.
Ronald Kwok