Sunday, August 30, 2009

S10 resurrection

Good news, my S10 has resurrected from the dead! After leaving the dead S10 with the local Lenovo service centre for 3 days, I called them and was told that it was ready for collection.

I went to the service centre and the S10 was given back to me. I asked the service guy if it was the hard disk or the motherboard that was faulty and he told me that it was the LCD connecting cable that was faulty which was rather unusual. It was a good thing that it was not the hard disk or I would have to reinstall all the programmes for my wife again. From the job sheet, the S10 was actually repaired the next day itself so it was a quick job. In fact the guy there told me that they called my number but there was no answer. I could only think that it was because I had scribbled my contact number so they must have called a wrong number so I'll give them the benefit of the doubt.

And since the S10 is still within the one year warranty period, there was no charge. In fact, they did not even ask me about the warranty so I presumed they checked their online records as I did my registration online.

The verdict on the service? Pretty good. Just hope I don't have to visit the service centre again!
Ronald Kwok
http://ronaldkwok.atomicblog.hop.clickbank.net

Wednesday, August 26, 2009

Death of S10

Well, it finally happened. When my wife turned on the S10 last Saturday, the screen stayed black and only the red power LED came to life. I tried all the usual tricks to try revive the S10 - pressing and holding the power on button for more than 10 seconds; removed the battery, press the power on button 10 times and then held it on for 20 seconds and put back the battery - still the same. Repeated the process with just the AC power and still the S10 did not come on.
Finally opened the back cover and removed the additional RAM and unplug and plug the Hard Disk but to no avail - my S10 is really dead.

After reading similar cases in Forums, I always thought that it cannot happen to me but the reality is that it does happen and now my S10 is added to the statistics of netbook that failed. The only thing left to do is to take it back to the shop where I purchased the S10. But alas, the shop, WinChance in Low Yat Plaza is also dead as it has closed shop and I have no choice but to send it personally to the local Lenovo Service Centre in Petaling Jaya.

So I left the dead S10 there and the service guy said it will take two/three days or more depending on what is wrong. He suspected that it could be the Hard Disk or the motherboard that is kaput. Well, this is a chance to see how good (or bad) the Lenovo after sales service is. What is your experience?

Ronald Kwok
http://cbpirate.com/s/cbp/ronaldkwok

Saturday, June 20, 2009

The Lenovo S10-2 and Lenovo S12

Hi folks, I'm back from my trip to Turkey. I had a wonderful time there; read all about it in my Travel Blog.


Just some updates on the Lenovo Ideapad S-series scene. Moving up from the S10, the current model available is the S10-2 but judging from feedback so far, it is not so well received. Here's a photo of the overall view, from latopmag.com where there is a hands-on review.


The main improvement seems to be the bigger keyboard with better layout.


Otherwise, it is not much different from the S10. In fact, many people is not too happy about the switch to a glossy screen (also smaller at 10.1" as compared to 10.2" for the S10) and the overall plastic look which is very similar to the present group of netbooks from the other brands such as Acer, Asus, MSI, etc. thus losing the more professional look of the S10. Since Lenovo is still practising the idea of having different configurations for different markets, do check very carefully what is included before you make a purchase.


If you are planning for an upgrade it may be better to wait for the S12 that has been announced but not yet available. This has a bigger screen at 12.1" and higher resolution of 1280x800 with the option of a Nvidia ION graphics chip. Thus it will have HD (High Definition) capabilities for your video viewing pleasure on screen or via a HDMI output to an external monitor. What more, it also comes with a full size keyboard. Here's a photo from engadget.com that also has all the other details of the S12.


It sure looks attractive and the only question is now the price. With this kind of specs, it is not much different from a normal laptop but with less processing power. How it will compete with similarly configured laptops will very much depend on the pricing. It is also losing sight of the main purpose of a netbook which is portability with small size and weight for basic internet tasks on the go.


Well, only time will tell.


Ronald Kwok

Thursday, May 21, 2009

Holiday break in Turkey

I will be away for two weeks in Turkey so there will be no new posts and I will not be able to respond to comments until I am back. Cheers.

Ronald Kwok
http://cbpirate.com/s/cbp/ronaldkwok

Thursday, May 7, 2009

Restore Fn Hotkeys & Screen resolution

Just a short post to answer some issues raised in the comments I received.

After using your netbook for a while, you may find that some of the Fn Hotkeys (such as the brightness, volume, etc) are not working. You can restore these functions by following the procedure below. This assumes that you have not reformatted your Hard Disk and the D: drive is still intact since all the Lenovo drivers are kept in this drive D. (If you have deleted these drivers, you can always download them from the Lenovo support site.) The Fn Hot-keys utility is hidden within the Lenovo Energy Management programme.

Open the Driver folder in drive D and click on the Energy_Management folder. Run the setup.exe file and the Installshield Wizard will appear.


There are two parts to this programme, one is the Lenovo Energy Management application itself and the other is the Function Hot-key (or shortcut key) Utility. You can choose Repair to restore to the original state or you can choose Modify to change the Energy Management application or the Function Hot-key (the Utility) application.


Note that you can deselect the Utility only after you have deselected the Energy Management if that's is what you want.


Some users informed that they could not install certain programmes because the S10/S10e/S10g resolution is less than that required by the programme. In such cases, you can trick the programme by changing the resolution to that required (or higher), install the programme and then switch back to the default resolution.

To do that, you can refer to my earlier post, "Using external monitor......." to see all the different resolutions and select a suitable one before installing the rogue programme. It may not work for all programmes but there is no harm trying.

Ronald Kwok
http://ronaldkwok.atomicblog.hop.clickbank.net/

Monday, April 27, 2009

Connection to LCD TV and CRT TV

In my earlier posts, I have written about connecting the S10 to an external PC monitor and there was no problem at all. My actual experience was connecting to an LCD monitor, Acer model, X173W and the S10 automatically switched to the maximum resolution of the Acer, which was a modest 1440 x 900. I believe it would be the same if you were to connect the S10 to an external CRT monitor.

Now what about connecting to an LCD TV as oppose to the LCD monitor? More and more of us are switching to LCD TV and most of these TV comes ready with an RGB terminal or also called the PC input terminal. Can you just connect your S10 to this terminal? Since I have just got myself an LCD TV, the Sharp LC-19A35M (a modest 19 inch, you can read more about this in my other Blog here) I was able to put it to the test.

For connecting to an LCD monitor, you do not need any external cable since the connecting cable is usually already fixed internally to the LCD monitor itself at one end and you just need to connect the loose end to the S10 RGB terminal (Lenovo calls this the VGA port). However to connect to an LCD TV, you would first need to have the right connecting cable and the one for this job is a RGB to RGB cable, with male to male connectors. An example from Amazon is shown here below.


The important point to note here is that the connectors at the cable must be male to male and not male to female as this type is also available. An easy way to remember the difference between male and female is to remember that male has pins while female has holes. Isn't this simple enough? So in this case we need a cable with pins at both ends to fit into the holes at the S10 and at the LCD TV. Now with the anatomy lesson out of the way, let's move on to see how the S10 performed. (Another point to note is the length of the cable required so that it can reach the LCD TV comfortably.)

Just like in the case of connecting to an external LCD monitor, there was no problem. The S10 switched automatically to 1024 x 768 resolution (in my case) to match the most suitable resolution of the LCD TV. The Sharp LCD TV has a resolution of 1366 x 768 so the one used by the S10 was the closest usable resolution. This has an aspect ration of 4:3 and since the S10 display also emulate this resolution (when both the displays are on), you need to scroll the S10 screen to see the whole display. Remember you need to press Fn+F3 to select one or both the S10 display and the external LCD TV.

What about connecting the S10 to a normal CRT TV (not LCD TV), will it work? Yes and No. If you just connect with the VGA to RCA video cable like this one below, it will not work. This cable is meant for PC/laptop with a TV out video card and S10 does not have this so it will not work. So DO NOT BUY THIS for the S10.


To connect your S10 to a normal TV (non-LCD), you will need a VGA to Video converter like this one below. This is just an example and there are other models available. Since I have never use one before I cannot comment on the quality so users who have used this may want to comment.


For those of you already owning an LCD TV and you want to have your S10 connected to the big display, all you need is to get the RGB to RGB cable detailed above. But first check that the LCD TV has the RGB or PC input terminal. This terminal is only for the video and if you want to have the audio, you will need to have a cable to connect the earphone output on the S10 to the audio input terminal of the LCD TV. The type of cable needed will depend on the audio terminals provided by the LCD TV. For my Sharp LCD TV, the audio connection for the PC is the stereo jack so I just need a direct male to male stereo jack for this purpose. Some LCD TV may provide only the RCA audio input terminals and and to connect these you will need a cable with the stereo jack at one end and two RCA plugs at the other end. An example is shown below.


Happy big screen viewing!

Ronald Kwok
http://ronaldkwok.atomicblog.hop.clickbank.net


Wednesday, April 15, 2009

Webcam (Bison) firmware update issue - hotfix

Here is the latest solution provided by Lenovo for those of you who are having problem with the webcam on the S10 or S10e after the firmware upgrade. You can download the latest firmware that solves the problem here but please read the release notes carefully before you take any action. I have reproduced the main points below and the most important point to note is not to do any firmware upgrade if you are not having any problem with your webcam.

"SYMPTOM:
After installing the Bison Camera Firmware Upgrade, the S10 camera will stop working and display only grey or black background.
AFFECTED CONFIGURATIONS:
Ideapad S10 can be equipped with two different camera sensors. The firmware upgrade available on the website, (version 1404) would damage the existing firmware of one of the cameras and cause the problem described above.
Important Note: This hotfix must ONLY be installed on the machines affected by the symptoms described above. If the camera is working properly, do not install this hotfix. Otherwise, the camera firmware will be destroyed permanently.
A new Firmware upgrade, version 1405, has been released and is available on the website in order to prevent the issue from happening."

Good luck.

Ronald Kwok
http://ronaldkwok.atomicblog.hop.clickbank.net/


Sunday, April 12, 2009

Miscellaneous items about S10 to be aware

Here's a variety of miscellaneous items about the S10 that users should be aware. Some of them are culled from the Lenovo's forums.

1. If there's pressure on the cover (the LCD screen) when it is closed, it may leave imprints of the keyboard on the screen over time. Ensure heavy items are not placed on the cover or carried in a very cramped bag and you can put a piece of cloth or plastic between screen and keyboard to prevent this.

2. The Lenovo logo comes out quite easily, especially the letter 'e' when caught in a cleaning cloth, maybe because of the sharp edges. So be careful when cleaning around the Lenovo logo or you may want to use a stronger glue for the logo if you are handy for this.

3. If the mouse pad jams, i.e. the cursor no longer moves with your finger movement, plug in a normal USB mouse and move around; it will usually release the jam without having to restart Windows.

4. The front ends of the cover and the palm rests seem to be magnetic (to ease the closing and hold them together) so be gentle when you close the cover or there may be a loud thud. It may not break anything but it may break your heart or shock the Hard Disk a little!

5. It was reported by user TarveN that his Nokia E71 cellphone has caused his S10 to reboot when he placed in on the keyboard. So be aware that this could also happen with other cellphones but why would anyone want to leave his cellphone on the keyboard?

6. This has been reported by some users so it may or may not work if you encounter the same problem. If the S10 cannot turn on, disconnect the battery and AC, press and hold down power on button for 10 seconds. Reconnect with AC or battery, press power on button again and it'll be OK. Hopefully!

7. There has been plenty of new Bios upgrade on the Lenovo site in attempts to solve the noisy fan problem, the latest one being version 59. If you do not have the noisy fan, do not upgrade your Bios as the feedbacks have been mixed and some are negative. It is better to wait for a final version before you do the upgrade since testing is still going on.

8. Many users have reported that upgrading the webcam using the latest Bison firmware has killed the webcam so do not use this firmware. As long as you are not having any issues with your components, there is no need to upgrade to the latest drivers since some have caused more harm then good. So it is a case of "don't fix it till it's broke".

That's all folks. I am distracted by the aroma of the Easter feast that my wife is cooking up in the kitchen. And a Happy Easter to all.

Ronald Kwok
http://cbpirate.com/s/cbp/ronaldkwok

Saturday, March 21, 2009

All about Batteries for the Lenovo S10

Here are some snippet of information that are from the two popular Lenovo Ideapad S series forums, one official, and the other unofficial. These are all about the batteries put together here for easy reference.

When the S10 was first released, it came with the 3 cell battery as the standard but it could last on the average for only 1.5 to 2 hours and this was a big disappointment to many who are always on the move and a great disadvantage when compared to other netbooks like the Asus EEE and Acer One that had longer lasting batteries, about twice that of the Lenovo 3 cell battery. Below is how the 3 cell battery looks when fitted into the rear of a S10. (Pic from NotebookReview.com)

Soon came the news of a 6 cell battery that first made its appearance with the S10e in the European market towards the latter part of 2008 and this 6 cell battery became a standard with the S10 in some Asian market. Pic below shows the extra load of the 6 cell hanging down. Refer to my post in this Blog that is all about the 6 cell battery
here.


Since man is never satisfied and always wanting more and more, early this year saw the debut of the 9 cell battery. As this has three times the number of cells (of the 3 cells), it will last 3 times as long and also weighs roughly three times as heavy and is 3 times the size. Not to mention it takes three times longer to be fully charged. You cannot have your cake and eat it, you know. Pic below shows the bulk of the 9 cell, courtesy of nickrg3 in the unofficial Lenovo S series forum.


Below is a rough comparison of the 3 types of battery currently available. How long it lasts depends a lot on the activities of the netbook.

3 cell weighs 150gm, lasts for 2 hr and takes 2 hr to charge
6 cell weighs 300gm, lasts for 4.5 hr and takes 4 hr to charge
9 cell weighs 450gm, lasts for 7 hr and takes 6 hr to charge

Which size of the battery (3, 6 or 9 cells) is the best for you? It all depends on your needs and how you use the S10 most of the time and it really comes down to personal preference. Personally, I feel the 6 cell battery is the best way to go as the 3 cell lasts too short and the 9 cell is too bulky and weighs a bit too much which defeats the main purpose of a netbook which is reduced size and weight for mobility when compared to a normal notebook/laptop.

There is also some confusion as to which battery will fit which model of the S series Ideapad. Here's the good news, all are interchangeable so any battery that you pick will fit whether it is a S9, S9e, S10 or S10e since the external physical size of the current S series Ideapad is the same (only the screen size and configuration are different). There appears to be only two colours currently available for these batteries, i.e. black or white so those of you with S10 of a different colour will have to make do with one of these colors and cannot get a fully color-matched combination.

The battery is held in position by two locking mechanism at the bottom of the machine. The one on the left is spring loaded while the one on the right is manually switched. To unplug the battery, switch the lock on the right to the open position (towards the left) and hold the spring loaded in the open position (towards the left). More important is that after plugging in the battery, ensure that both the locks are secured, especially the spring loaded one or you may find the battery a bit wobbly.

The second LED in the front of the LED is the Battery status indicator. It is orange when the battery is being charged and is blue when the battery is fully charged. There is also a power icon at the task bar that shows the current power status and the life left of the battery if being used.

If you leave your battery plugged in for some time, you will find that it will not reach 100% charge when it stops charging (LED battery status turns blue.) To overcome this, remove the battery and leave it for a while. The next time you charge your battery, it will reach 100% when fully charged. Another key point to remember is never unplug your battery when it is connected to the mains, it will result in weird charging problems such as never ending charging time. You should only remove the battery when everything is off.

For those who intend to travel abroad with your S10, the Adaptor/charger is universally rated at 100-240V and 50-60Hz and thus can be used anywhere in the world; you only need to ensure that you have the correct pin adaptor to connect to the mains. It would be easier to get one of those universal pin adaptor that can be plugged in anywhere.
(The points below are added subsequently.
The battery will not reach its full capacity until it has gone through a number of charging cycles initially just like other lithium-ion batteries. My original Lenovo OEM 6 cell battery will not charge until it falls below 90% so I normally leave it plugged in and not worry that it will get charged unnecessarily, thereby reducing the battery life since it is normally given in the number of charging cycles. But it is good to remove the battery from time to time and also let it be fully discharged every now and then and then fully charged to give it the full works, so to speak even though it does not have that "memory effect" of older generation batteries. Nevertheless, it will looses its capacity over time and will die a natural death eventually as nothing lasts forever.)
Hope you are now fully charged and ready to be on the move with your S10.

Friday, February 20, 2009

One Key Recovery - OKR not OK?

Apart from the noise of the fan (which is the number one complaint from user of the S10), the OKR has also received a lot of posts in the S10 Forums and is also a source of confusion for some users.

Firstly, the name OKR itself is already confusing since it is sometimes referred as One Key Rescue, One Key Restore or One Key Recovery and are used interchangeably. Strictly speaking there are two parts to this OKR. One is the Windows programme (OneKey Recovery 6.0) that you can start normally from within Windows or by pressing the OKR key (the orange arched key at the top of the keyboard) when Windows is running. This will bring you to the screen below. This should rightly be called One Key Backup.

This is where you can backup your system partition (normally drive C:) into an image file in drive D: (by default) or another location of your choice. When I tried this on my S10, it took about one hour to create the image file that was about 8G in size. Below are the steps involved.


Once you have this image file, you can now create bootable recovery discs either on CD or DVD. Of course you will need to have a USB CD/DVD burner to do this. Here are the stages involved.


Don't be alarm if initially the time remaining shows something like 4 hours but in reality it takes much shorter; in my case, it took 40 minutes to burn 9 CD's. The actual time will depend on the size of the image file and also the speed of the burner used.

Now that you have got your backup image, how do you proceed to restore your system in case of problem? There is no restore menu under this One Key Recovery programme. This is where you need to get into the other programme - the One Key Rescue System. You can only access this by pressing the OKR button on the keyboard when Windows or the power is off as this program runs independent of Windows itself. Make sure your battery has sufficient power left or better still, plug into the mains power before you press this button since the restoration process may take some time depending on the options.

It is here that you can choose to restore what you have backup earlier OR to restore the original factory default settings.

The program will take some time to start and in fact at times there seems to be no activity so you need to be patient. It is here that you can choose to restore your system from the backup image file you created OR to restore the original factory default settings. There is only one requirement if you want to get back to the factory setting - the size of your C: drive must not be physically changed i.e. it must be the same size as when you got it the first time. For those of you who has re-partitioned drive C: or combined with D: drive, etc, you will not be able to restore to the original factory setting. (Many of you will say, who cares!) However, if you have physically changed partition C:, what your have backup can still work and it will be restored to whatever state it was in when the backup image was made. So the choice is yours.

If you have made the backup discs, they are bootable and you just run them normally when you power up without going into the One Key Rescue. Also they can be used to restore your system if you have upgraded to a new hard disk drive (HDD).

By the way, you can access the Help under the One Key Rescue program by clicking the ? on the screen. It gives a much better explanation that the printed user guide provided with the S10.


The main issue is that users are not too keen with the OKR and users would much prefer to have the Windows discs rather than the recovery key. These can be used as and when required and are much more flexible than creating backup discs if one just want to re-install Windows either because of some problem or upgrading to another HDD. Just imagine, my backup took up 9 CD's! I suppose it's time to switch to DVD's.

(Please note, all the above refers to the Lenovo S10. I believe the S10e does not come with the OKR function.)

Ronald Kwok

http://cbpirate.com/s/cbp/ronaldkwok


Saturday, February 7, 2009

Let there be light (and RAM)

Today I did my first mod for my S10 and this must be the simplest. I just added a 2G RAM. My S10 came with 1G RAM which consists of two 512M RAM's, one is soldered in and the other in the RAM slot. To upgrade, I removed the 512M RAM from the slot and replaced it with a 2G RAM. (I used a Kingston 5300 DDR2 667 module). Thus the 512B RAM is left soldered in but the total usable memory is only 2G which is the limit of what the processor can access. Thus 512M of memory is wasted.


To carry out this upgrade, first disconnect the mains and the battery. This is to prevent any stored stray current from damaging the RAM. Next, touch any metal surface to dischage any static current from your body. Remove the two screws at the bottom of the S10 and pull out the cover. You will see the installed RAM or the empty RAM slot on the right, depending on what size of memory came with your unit. On the left is the HDD which you can also easily upgrade if you so wish.


If there is a RAM istalled, spread the securing clips on either side of the RAM and it will pop up at about 45 degrees.


Carefully remove this RAM and inset your new RAM into position, at about 45 degrees slope. Press down the RAM until you hear the click of the securing clips and you are done. If not, spread the clip and repeat the whole process.


When you put back the cover, press down firmly at the threee palces where there are catches. The cover may not be flushed initially but once you tighten the two screws, it should be.


You can check the amount of memory you have by going into the System Properties. To get there, go to the Control panel > Performance & Maintenance > System, or from My Computer > View System Information under System Task. Near the bottom of the System Properties you will see the size of the memory reported.


In fact Lenovo has a series of video if you want to carry out more modification to your S10, though they are meant more for service personnel. Anyway, they can be found here, courtesy of skyhook59 in the Lenovo S10 Forum. With these you can take your S10 apart and (hopefully) put it back together again. But do be mindful that certain modifications may void the warranty of your S10 so check with Lenovo first.


For those less adventurous, here's just a tour of the various indicators available on the S10. There are three LED's at the front. The first is the power indicator which will be blue when the S10 is on either on AC or battery. The second is the battery indicator. It will be orange if the battery is charging and blue if the battery is fully charged. The third is the wireless indicator. It will be blue if WiFi is on, orange if Bluetooth is on and purple (blue + orange = purple) if both are on. These will flicker when there is any wireless activities.


If this is not lit at all, check that the wireless function is switched on by pressing the green wireless button next to the orange One Key Recovery button on the top of the keyboard. Once the wireless is on, you can select either the WiFi or Bluetooth or both to be on by pressing Fn F5 to access the wireless setting window below.


If you are not using any Bluetooth devices, it is best to turn Bluetooth off since it will save you some battery power.

The other three indicators are found next to the power-on switch at the top of the keyboard. They are the CapsLock, NumLock and HDD indicators. Of particular interest is the NumLock. For some strange (and unknown) reasons, the NumLock is enabled when the S10 is first switched on, out of the box. Not sure even if the NumLock light is on or not in this first instance. Because of this, it has caused a lot of frustration to user who had problems connecting to their secured wireless network for the first time. This is because the NumLock is on unknowingly and when one keys in the security or authentication key it will be wrong if the digit 0 (zero) is used as a / (slash) will be entered instead. (The slash is on the zero key - top row of the numbers - and will be entered when pressed if NumLock is on.) Users will not know since all you can see is just ********** as the key. Of course they cannot connect to their wireless network since the security/authentication keys do not match.
So if you have problems connecting to your secured wireless network (or entering other passwords), first cycle through the Fn F7 to make sure that NumLock is not on. After the first switch-on, the Fn F7 will function normally. It will be interesting if users can feedback any other quirks they find on their S10 in the comments.
Ronald Kwok

Thursday, January 29, 2009

Sound advice on Sound

As the title suggests, this post will be all about sound, good or bad, on the S10.

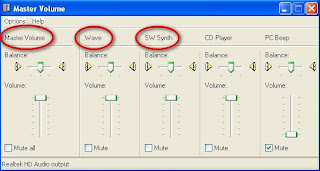
The first time I heard the S10 sound, I felt that it was too soft even for a tiny netbook. So I went to the Speaker icon (for volume) on the system tray to access the Master Volume dialog box and adjusted it to full volume but it was still soft. Later I found that you have to increase the Wave button volume and also the SW Synth button volume in order to get a decent level of sound. Now it is not too bad for its size.


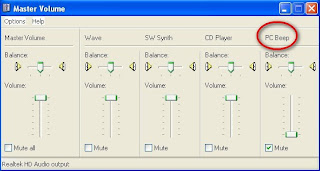
There is an audio beep when you connect or disconnect AC power to the S10. This is good as you will be alerted if someone disconnected your power but the beep is way to loud. In order to reduce this, you access the same master volume window at the system tray and set the PC Beep button to a lower volume or mute it altogether.


By the way, there is no shortcut mute button (Fn +) on the S10 so stop looking for it. You have to reduce the volume by pressing the Fn + Left Arrow key repeatedly.

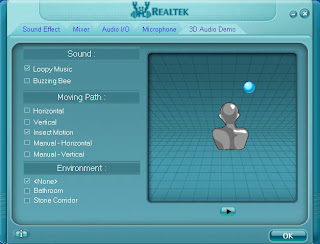
There is another speaker icon in the system tray, a more stylish one and you can access this to tweak the Realtek audio driver. Click on this and you can set the sound effect, adjust the mixer, the mic, etc. You can also run the 3D audio demo to impress your friends with the S10, if nothing else.


Another complaint is that the click button on the touch pad is too loud. If you want, you can open up your S10 and dampen the sound by using some tape or something similar but that is too much work. The easier solution is to use the tap to click on the touch pad itself and not to click the button physically. It's much simpler this way. By default, the tap to click is enabled but if for some reason this is not, you can access the Synaptics Touch Pad setting screen to enable it. Refer to my earlier post on the Touch Pad.


Finally the sound topic that has the most number of complaints in the S10 forums is about the cooling fan, that it is making loud annoying sound ever so often when it is on. Personally I do not find the fan 0n my S10 to be annoying and it does not come on that often. Yes it is louder than my Dell laptop but it is not as loud as my desktop so it is some where in between and definitely tolerable. Not sure if I am lucky or my hearing is bad!


If you find your fan on the S10 loud and annoying, there is no quick fix. Some users have tried different ways to reduce the noise - upgrading the BIOS (some reported no effect), removing the wire mesh, reducing the voltage to the fan, and one even disconnected the fan!

If it is really that bad, take in back to Lenovo for them to fix it. Otherwise, just get used to the sound. You may eventually like it. Cheers.


Ronald Kwok
http://cbpirate.com/s/cbp/ronaldkwok


Tuesday, January 20, 2009

Using external monitor and extending desktop

One question often asked in Forums is whether the S10 can support external monitors at resolutions higher than the native 1024 x 600. The answer is yes, the S10 will support an external monitor connected to the VGA port at various common resolutions. At the maximum end, it goes up to 2048 x 1536 so it shouldn't be a problem if you have a LCD monitor and you want to connect it to the S10.

In fact, if you just want to use the external monitor instead of the built in screen, you simply connect it to the VGA port and cycle through Fn F3 to get just the built in screen, both the monitors or just the external monitor. It will automatically goes to the maximum resolution of the external monitor by default if you have not made any manual adjustment earlier.


If you want to check what resolution the display adaptor can support, you can do the following.


1. Right click on the desktop and click on Properties.

2. On the Display Properties dialog box, select the Settings tab.


3. Click on monitor 1 if it is not selected.


4. Click the Advanced button.

5. The display card General Properties appear, click on the Monitor tab.

6. Uncheck the box - Hide modes that this monitor cannot display - and click Apply.

7. You can now see all the resolutions that are supported by the graphics adaptor.


There is another good use of the external monitor and that is to extend the existing desktop. Here's how to do it.

1. Open Display Properties dialog box.

2. Click on monitor 2 (the external monitor). It turns blue.
3. Check the box - Extend my Window desktop onto this monitor and click Apply.


4. A blank background of your existing desktop will now appear in the external monitor.


5. Adjust the screen resolution as necessary.
6. You can now open any window and drag it across your screen into the external monitor. (You can only do this for those windows that can be dragged i.e. those that are not maximised. Once the windows is in the external monitor, you can resize and position it as required or you can maximise it and it will fill the external screen.


The two displays forms one extended desktop and you can move from one to the other by moving your mouse pointer across the screens, it is so magical. Now you can watch President elect Obama's historic inauguration on one screen and the Forex market epic battle in another screen and not miss a single beat or a single pip.


Just in case you run into trouble after making all the adjustment, there is one safety net.

1. Right click on desktop and click on Graphics Properties....The following appears. (This is for both screens active, if only one is active, either Notebook or Monitor only will be shown.)


Now you can make changes to the Display Settings (the resolutions) to what you might not be able to do in the normal Display Properties. You can also make color corrections if so desired.


I must stop now to watch President Obama's big day on the big screen.
Ronald Kwok